Saturday, February 28, 2009

Moroccan Stew

I saw Aida make this dish on FoodNetwork over winter break. The fact that I remember this is all too impressive--I had my wisdom teeth removed and remember very little from those few pudding-filled days of my life. It reappeared on SmittenKitchen when I returned to school, and I couldn't help but whip up a batch.

This recipe would have served a lot of people. I'm fairly certain just Matt and I ate it that night, and then I had leftovers for the rest of the week. Every morning I'd make some Minute-Rice to pack along with some of this stew.

And what a stew it was! I loved the combination of chickpeas and butternut squash, and the heartiness of the potatoes. If I would have added the olives, I'm sure I would have loved it even more. If you've never tried cinnamon in savory food, this is a good first step. This stew isn't hot like you'd expect either, but extremely fragrant from the cinnamon and a little spicy from the cumin.

I omitted some ingredients and changed the recipe to be a more "on the fly" (read: realistic) version, so I can't speak to its authenticity (see Smitten Kitchen's version here, which includes saffron, preserved lemon, cilantro and almonds). It is, however, delicious.

With this recipe, I found it very wise to chop everything ahead of time, as if you were doing a demo on television.

Moroccan Stew
Serves 6-8
1 tablespoon unsalted butter
1 tablespoon olive oil
1 medium yellow onion, small dice
4 medium cloves garlic, diced
2 teaspoons ground cumin
1/4 teaspoon cinnamon or 1 (3-inch) cinnamon stick (if you've got that on hand)
Salt and freshly ground black pepper
1 pound butternut squash, large dice
3/4 pound potatoes, large dice (the recipe suggests red, I used Idaho because they were on sale)
2 cups low-sodium chicken or vegetable broth (I used Rapunzel Vegan Herb Bullion cubes)
1 (14-ounce) can chickpeas, drained (roughly two cups)
1 (14-ounce) can diced tomatoes, with juices
1 cup brined green olives (optional)

1. Heat butter and olive oil in a good, solid soup pot or dutch oven (with a lid) over medium heat. Add onion, garlic, cumin, and cinnamon, and season with salt and freshly ground black pepper. Cook, stirring occasionally, until spices are aromatic and onions are soft and translucent, about 5 minutes.

2. Add squash and potatoes, season with salt and freshly ground black pepper, stir to coat, and cook until just tender, about 3 minutes (Idaho potatoes will take longer).

3. Add broth (I used Rapunzel Vegan Herb Bullion cubes), chickpeas, tomatoes and their juices, and saffron, if using. Bring mixture to a boil then reduce heat to low. Cover and simmer until squash is fork tender, about 10 minutes.

4. Serve with rice or couscous.

Friday, February 27, 2009

Hummus, deconstructed.

&
=

So now you have bread. Undoubtedly you have your favorite way to enjoy it--with wine, dipped in olive oil and cayenne pepper, spread with peanut butter, toasted with jam, smeared with nutella and topped with bananas...the list goes on.

But here's another way to do things. This sandwich recipe is almost like a deconstructed hummus. I was intrigued primarily because I love chickpeas, but also because there's a potato masher involved. Lord knows I love my potato masher, and have found enough uses for it to justify the dollar I spent on it.

This sandwich is also vegan (shhh!) and probably somewhat healthy, but please, don't let that stop you. It keeps well wrapped up in a sandwich or in the fridge and, depending on how much olive oil you 'glug' in, will not make your bread mushy.

Deconstructed Hummus Sandwich
Makes about 4 sandwiches
1 loaf no-knead bread
1 15-ounce can chickpeas, drained and rinsed
2 tablespoons pitted, halved and very thinly sliced black olives
1 tablespoon finely chopped red onion
1 tablespoon chopped fresh parsley
Zest and juice from half a lemon
Couple good pinches of salt
A few grinds of black pepper
A few glugs of olive oil

1. Combine ingredients in a medium bowl.
2. Using the back of a fork or a potato masher, lightly smash the chickpea mixture until you're somewhere between a coarse chop and a puree. This is a wide margin of texture, I know, but you want there to still be visible pieces of chickpea but enough puree to hold the mixture together.
3. Spoon the mixture on to the bread. Use the back of the spoon to spread and condense it.

It really is that easy. The olives lend the saltiness, the lemon the acidity, the parsley a fresh taste, and the red onions a spicy note. The chickpeas are an excellent vehicle for all these strong flavors. I'd call it a well constructed deconstruction.

Here's one for a bad week, as it seems many of us had:

Love Does That
Meister Eckhart

All day long a little burro labors, sometimes
with heavy loads on her back and sometimes just with worries
about things that bother only
burros.

And worries, as we know, can be more exhausting
than physical labor.

Once in a while a kind monk comes
to her stable and brings
a pear, but more
than that,

he looks into the burro's eyes and touches her ears

and for a few seconds the burro is free
and even seems to laugh,

because love does
that.

Love frees.

Wednesday, February 18, 2009

Sacrament.

I have a petty complaint to share. Pastors and future pastors take note.

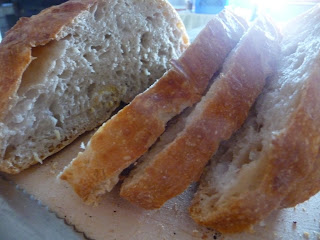
Nothing bothers me more than awful communion bread. Let's be honest--when we're talking about Christ's body, I do not imagine perfectly cut, crustless cubes that taste pasty and bland. How do you expect that to transubstantiate? Christ's body has heft, heartiness, and rough edges. It has a good crust, but is soft and chewy on the inside.

I have found such a bread. I have made such a bread.

To you foodies out there, you've read this all before. This is the NY Times bread, which exploded on the internet a long time ago. I, however, did not have the proper pot for it. Now that I say it, I still don't have the proper pot, but it will be a long time before I can afford a Le Creseut. I found this beauty (pictured) at the Philly AIDS Thrift for $9 and because it is heavy construction and lid, does the job.

So how do you make this miraculous (pun intended) bread?

I'll tell you one thing--there's no kneading involved. So all you faint-of-heart who shy away from breadmaking for fear you will become fatigued (or grotesquely muscular), do not fear. Simply mix the ingredients, and let rise for 18 hours. Fold it over itself twice and let it rise for two more. Pop it in the oven for half an hour or so. Breadmaking sans bread machine does not get easier or more delicious.

I'm going to pass along Smitten Kitchen's version of the recipe, because it is artfully written and takes great care to explain the difference in yeasts to novice cooks like myself.

In exchange, I'll offer you one of my favorite poems (introduced to me by a dear friend), perhaps of all time.

Sacrament II
Kathy Galloway

I have sat here many times
watching the breaking of the bread
and the raising of the cup,
and felt many things.
Anger at exclusion,
shame at division,
incomprehension at abstraction,
sadness at separation,
frustration at a beautiful simplicity
tangled into twists of dogma.

But this is a gift.
It is a sacramental moment.
This is, after all,
the sacrament of brokenness.

Bread is not broken to be stuck back together.
Life is not broken to be stuck back together.
Wine is not poured out to be put back in the bottle.
Life is not poured out to be put back in the bottle.

We incorporate brokenness into ourselves
and are made whole.
This absence is an appropriate remembering.
I am nourished by my empty-handedness,
refreshed by my dry throat.
These, more than the other, will ensure
that I will sit at dinner with my children,
in a cafe with a friend,
in a bar with strangers
and it will all be remembering
and it will all be sacrament.

May it be so.

Sunday, February 15, 2009

Heart and Soul.


These two photos are probably confusing you right now.
For starters, the first photo certainly doesn't look like the second. The second photo has (!) meat in it, too. What is going on here?

Making stock should be a basic part of any cook's repertoire. It is also extremely expensive to buy. I read somewhere about making stock from a rotisserie chicken--which I knew were sold at Bobby Chez (South, between Broad and 13th) on Sundays for $5. So for $5, I could have both the stock and the meat for a hearty chicken noodle soup.

The rest of the ingredients for stock I already had on hand, mostly because the ingredients for stock are things we would ordinarily throw away. The chicken carcass, onion skins, cheese rinds, unused portions of carrots and celery are really all you need.

I've started collecting stock items in the freezer. I cut the top off a 2 liter soda bottle and started saving onion skins, cheese rinds, root vegetables that were about to go bad...I'll be ready for stock any time.

Chicken Stock
Makes enough for one pot of soup.
Remember, this ingredient list is not absolute. This is just what I used.

1 rotisserie chicken carcass, with some meat/skin left on
2-3 quartered onions, with skins, bottoms and tops lobbed off
3-4 carrots, unpeeled, broken into 4-5 pieces
3-4 celery stalks, with leaves, broken into 4-5 pieces
3-4 cloves of garlic, cut in half
Bay leaf
1 tsp. rosemary
1 tsp. thyme
1/4 tsp. black pepper

1. Add all items to a 4 qt. pot. Cover with cool water. Bring to boil.
2. Reduce the heat to a slow simmer. Let the stock simmer from an 1.5-2 hours. It should reduce to 1 qt. of liquid.
3. Let the liquid cool a bit and then strain using a fine sieve into a container.
4. Refrigerate until ready for use. You can skim the fat once the broth is cool, too.

I'm very particular about my chicken noodle soup. I find the chicken in just about any canned soup too mushy and, dare I say, sketchy looking. That's why I was so excited to get roasted white-meat chicken in this soup, that I myself could pick over and control.

This soup, like stock, is also open to interpretation. I like a lot of vegetables in mine, so my soup probably had even more than listed.

Chicken Noodle Soup
Serves a lot of people.

Stock (recipe above) or 6 cups of your favorite
1 carrot, diced
1 onion, diced
1-2 celery stalks, diced
1-2 garlic cloves, finely chopped
1 Tb olive oil
Salt and pepper
3/4 box Alphabet noodles (I'm not sure what the proportions would be for another type of noodle...but these are really fun. Hard to drain, but really fun.)
Half the meat from a rotisserie chicken, or one breast, chopped into bite-size pieces

1. In your soup pot, saute the onion, garlic, carrot and celery in olive oil until softened. Season with salt and pepper.
2. Add the stock. Cook at a medium simmer until vegetables have softened, about 20-25 minutes.
3. Meanwhile, cook your pasta to 'al dente' according to package directions. To drain the alphabet noodles, use a fine sieve or a colander lined with a clean, cloth dishtowel.
4. Add the pasta and the chicken. Let simmer for 10 or so minutes, until the chicken is warmed through.

I added more thyme, rosemary, black pepper, and plenty of salt to this, too.

This soup goes great with the pretzel rolls and with the NY Times Bread I'll be showing you next.

Tuesday, February 10, 2009

X marks the spot.

They're opening an Auntie Anne's Pretzels on campus. My M-W-F lunch friends have been sitting across from it for weeks, (im)patiently waiting for it to open. The smoothie place went out. The blue and white tile went up. We watched training happen. Today I left work ten minutes early to stand in line before lunch, and got two pretzels.

I love a good soft pretzel. Unfortunately, when I tried my hand at them, I was less than successful.

These pretzel rolls, however, made me feel much better about my pretzel making ability. I think they count as bread, since there is yeast involved, and I used them to create mini-sandwiches with some herb roasted turkey from Whole Foods and Dijon for lunch a few weeks ago.

Here's the recipe:

Pretzel Rolls
2 3/4 cups bread flour
1 envelope quick-rising yeast, or regular
1 teaspoon salt
1 teaspoon sugar
1 cup plus 2 tablespoons (about) hot water (125°F to 130°F)
Cornmeal
8 cups water
1/4 cup baking soda
2 tablespoons sugar
1 egg white, beaten
Coarse salt

1. Combine bread flour, 1 envelope yeast, 1 teaspoon salt and 1 teaspoon sugar in a large bowl with a whisk.
2. Using a wooden spoon, gradually pour hot water while mixing, adding enough water to form smooth elastic dough. Bop it around for about a minute to "knead" it.
3. Grease medium bowl (Use a butter wrapper--I save them in the freezer for the next time I need one). Add dough to bowl, turning to coat. Cover bowl with plastic wrap, then towel; let dough rise in warm draft-free area until doubled in volume, about 35 minutes (or longer if you didn't use quick-rising yeast).
4. Flour baking sheet, or clear area of counter. Punch dough down and knead on lightly floured surface until smooth. Divide into 8 pieces (So that's in half, in half again, and then one more time in half for you mathphobic among you, or me, who that helped). Form each dough piece into ball. Place dough balls on a floured baking sheet. Cover with towel and let dough balls rise until almost doubled in volume, about 20 minutes.
5. Preheat oven to 375 degrees F. Grease (or use parchment, like I did) another baking sheet and sprinkle with cornmeal. Bring 8 cups water to boil in large saucepan. Add baking soda and 2 tablespoons sugar (water will foam up). Add 4 rolls and cook 30 seconds per side. Using slotted spoon, transfer rolls to prepared sheet. Repeat with remaining rolls.
6. Using a serrated knife, cut an "X" on the top of each roll. Brush rolls with egg white glaze. Sprinkle rolls generously with coarse salt. Bake rolls until brown, about 25 minutes. Transfer to racks and cool 10 minutes. Serve rolls warm or room temperature.

They don't taste like Auntie Anne's, but they're good. Maybe one day I'll hunt down that recipe. Or work there long enough to steal it.

Friday, February 6, 2009

An affirmation.


I was recently talking to a good friend about affirmation. We all have those moments when we're suffocated by uncertainty about what we're doing, even if we're normally very secure in ourselves and vocation.

My friend Courtney made these muffins a few weeks ago and referred to them as "Cody's Muffins". If that isn't an affirmation--that what I love to do, I also do well--I don't know what is.

These are the infamous banana chocolate chip muffins, arguably my most popular variety, which are sometimes topped with walnuts (that get all nice and toasty on top). The batch pictured I made for Matt one morning, and he brought them to his friend Joel, Joel's grandparents, Joel's girlfriend and his roommate. He also had about three himself. They got a little bit more brown than I like, but no one seemed to notice but me.

I also used dark chocolate in this batch, but everything from milk to peanut butter to semi-sweet to white will work.

Cody's Banana Chocolate Chip Muffins
Makes between a dozen and fifteen, depending on the size of your muffin tins and your generosity among the cups.
1 3/4 cups flour
1/2 cup sugar
1/4 cup light brown sugar
1
teaspoon baking powder
1/2 teaspoon
baking soda
1/4 teaspoon salt
2 ounces (2 handfuls, about 3/4 cup I'd guess) chocolate chips
2 large eggs
8 tablespoons unsalted butter, melted and cooled
3 very ripe large bananas (approximately 1 pound) mashed well (about 1-1/2 cups)
1 teaspoon pure
vanilla extract
An extra banana

1. Preheat the oven to 350. Microwave the butter until melted. Let cool in microwave.
2. Whisk the flour, white sugar, baking powder, baking soda and salt together in a medium bowl. Set aside.
3. Mash the bananas with a fork or potato masher (you need to get your hands on one, pronto) in a large bowl. Add the eggs, brown sugar, vanilla, and butter. Whisk together well.
4. Using a wooden spoon, mix the dry ingredients and chocolate chips with the wet just until combined. Batter should be a little lumpy.
5. Using two teaspoons or a 1" cookie scoop, spoon batter into muffin tins with cupcake liners (I've also just greased the pan well--if you like a little bit of a crispy muffin bottom, this is for you) until 3/4 full.
6. Slice the banana into 1/2" slices. Place on top of each muffin (Only do this if you'll be eating them the same day! The taste doesn't change but the look still does. They're also delicious with a little brown sugar, or a lone chocolate chip, on top of the banana. These muffins don't need much decorating, though.)
7. Bake for 20-25 minutes or until a toothpick, inserted in the middle of the muffin, comes out clean (aside from any melted chocolate, of course).
8. Let cool on wire racks, then wrap in a dishtowel and store at room temperature.

These'll last a few days on the counter, but I highly doubt they'll last even one.